

datalink platform is called WebGate. It is a web interface to the datalink tracking system, accessible via most modern desktop or mobile browsers (IE9+, Edge, Chrome, Firefox, Safari, etc).
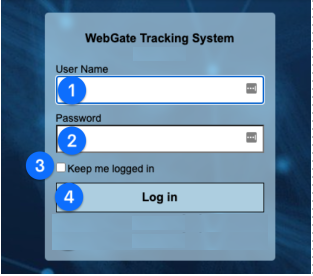
Navigate to www.webgate.org to load the login page, and then enter the temporary password provided to you. Next step. replace the initial password with one of your choosing.
1 username: it can be anything and not necessarily an email address but is limited to 15 characters
2 password: it can be anything but needs to be more than 8 characters and no more than 16 characters, you will be provided with a temporary password that we strongly recommend you to change after your first login. If you lose your password, you cannot reclaim on directly and you will have to enquiry your administrator to reset your password
3 The Keep me logged in option enables cookie to be stored on your machine to allow you to reconnect at any time. Only use this option on your own machine ! When an existing cookie is detected, the log in prompt will be bypassed and replaced with a choice to continue as the previously logged in user. Select Log in as another user to start a new session.
4 Once you’ve entered your credentials, simply click the Log In button
5 You can use an automatic authentification using your google account instead but you will for this need to enter your corresponding google account email address into the list of the user’s email address (see here: User Alerts)
You may only log in with the same user name on one device at a time. If an existing session is active you will be prompted to confirm your log in, after which the other session will be closed.
If you have lost your password, you can ask your operator to reset it or ultimately contact us
You have been provided with a temporary password, it is safe and recommended to change it at your first log-in in case you did not saw the prompt to proceed this at the first log-in.
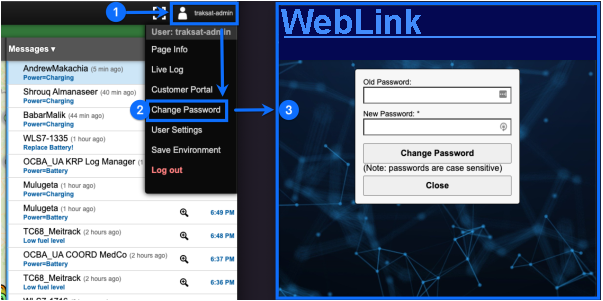
1 In the title bar, click on your user name on the right side.
2 In the contextual menu, click on Change Password
3 A pop-up will be displayed, enter your old password and you new password. Confirm by clicking the button Change Password. If all OK, you will have a green prompt confirming the new password has been set-up. You can click on the Close button to revert the main page.
The WebGate page will appear after the log in succeeds. There are two versions of the page: touch and non-touch.
By default the touch version will be shown when accessing the page from a mobile device, while the non-touch version shows for desktop browsers.
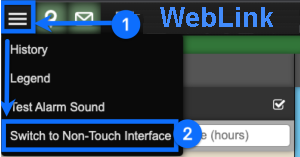
1 You may also select which version you prefer on the main menu at the top left of the screen
2 Click on the Switch to Non-Touch Interface menu
This choice will be saved for your next log in from that device.
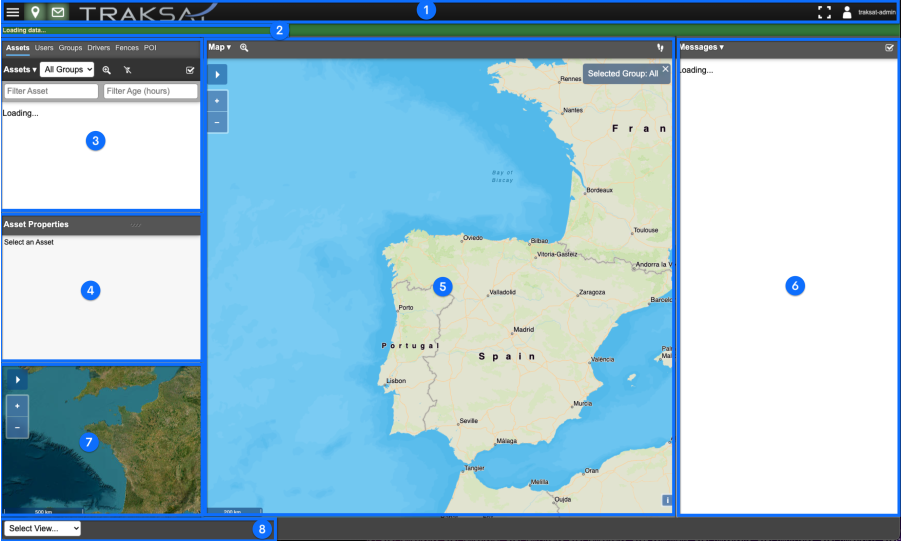

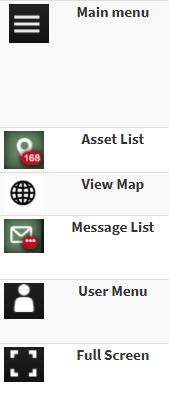

Depending upon your rights and permissions granted you will see various possible list to display You will see a light blue line under the list you’re currently displaying (here for example the Assets list)

Click below buttons to access special pages about each list type
Assets Display all your assets group by group.
Users Display all the other users, if you have sufficient rights toward a user you can then configure it from here.
Groups Display all the groups and sub-groups.
Drivers Display all your drivers and pilots names and tags.
Fences Display all the circular and polygon geofences you have created or shared.
POI Display all the Point of Interest you have created or shared.

A few base maps are regionals and some others are vector maps requiring a web page refresh to display correctly
Clicking on an asset on the map will select this asset on the asset list. If the asset list is not currently visible then the asset properties window will appear.
By default at first connection, it is possible that all the available map overlays are loaded and it is highly recommended to deactivate some, so that the map remains readable.
Please refer to the dedicated page for more details on mapping options
Clicking on the map header shows the following menu:
Click on this icon in the map header to toggle follow mode on or off.
With follow mode on (icon highlighted in green), the map screen will automatically scroll to keep the currently selected asset in view (at the current zoom level).
It is particularly helpful to monitor a vehicle that needs to be followed on map while it is moving without the constant need to move the map along the vehicle trip.
If a group is selected (by clicking on the group name in the asset list) or all assets have been selected (by clicking on the “zoom to all” icon on the asset or map header), the map will scroll and zoom to provide the best fit for all selected assets.
If you keep the option active while displaying another asset or group, the map will scroll and zoom accordingly over the new asset selected in the asset list !

Clicking on the messages header shows the following menu:

Distributed under License granted by
Copyright © 2025 Datalink System LLC
We sincerely appreciate your time in reviewing our presentation. Thank you for allowing us to help shape a stronger, more impactful vision for you and your team.